<?php
$str = <<<'EOT'
{"name_first":"John"}
EOT;
echo json_encode(json_decode($str), JSON_PRETTY_PRINT | JSON_UNESCAPED_SLASHES);
^ Save the file. Name it something such as json-pretty-printer.php and then run it on the command line by typing 'php' then the path to your script. Hit enter. Boom.
Friday, December 2, 2016
How Do I Make a JSON Pretty Printer App Using PHP for Development/Debugging Use as a Coder?
Ya'll know you don't wanna be posting your app's JSON responses, which may include sensitive information, to some third party website which could easily or accidentally log this info... think, decrypted passwords might be in your response, API keys, the name of your app. Lot's of stuff ain't nobody but you should see. So here, make your own JSON PRETTY PRINTER using PHP and RUN IT LOCALLY on your comp. Yea boi! Get it!

Saturday, January 30, 2016
Wednesday, January 27, 2016
How can I search the entire (unix) file system for files whose name contains a specific substring?
# To list files whose name contains "yoursearchterm"
find / -name "*yoursearchterm*" -print
Swap the "/" with a more specific path to limit your search. Add "-maxdepth 1" after the path and before "-name" to limit your search to a single directory.
Credit: http://stackoverflow.com/a/11329078
Friday, July 17, 2015
How to link your Mac's standard php location (/usr/bin/php) to a specific version somewhere else in the file system.
To map your Mac's standard php location to a specific version somewhere else in the file system, run the following command:
sudo ln -s /Applications/MAMP/bin/php/php5.5.3/bin/php /usr/bin/php
Wednesday, April 15, 2015
How Do I Configure iTunes to Store iOS Device Backups on an External Hard Drive?
Sadly, this is done via Terminal rather than iTunes.

ln -s /Volumes/1TB\ Fantom/iOSDeviceBackups/Backup /Users/johnerck/Library/Application\ Support/MobileSync/
Monday, December 15, 2014
Thoughts on setting up a CentOS 7 box
# VARIABLES:
# my_ip_address: 23.253.55.25
# my_first_not_root_user: admin
# my_ssh_port: 4972
# my_bitbucket_project_1_owner_username: abovemarket
# my_bitbucket_project_1_name: logs.abovemarket.com
# my_bitbucket_project_2_owner_username: abovemarket
# my_bitbucket_project_2_name: new.abovemarket.com
# my_server_admin_email_address: john.erck@abovemarket.com
# my_local_path_to_wildcard_crt: ~/Business/Above\ Market/SSL/STAR_abovemarket_com/STAR_abovemarket_com.crt
# my_local_path_to_wildcard_ca_bundle: ~/Business/Above\ Market/SSL/STAR_abovemarket_com/STAR_abovemarket_com.ca-bundle
# my_local_path_to_wildcard_pem: ~/Business/Above\ Market/SSL/STAR_abovemarket_com.pem
# my_local_path_to_wildcard_key: ~/Business/Above\ Market/SSL/STAR_abovemarket_com.key
# my_remote_filename_for_wildcard_crt: STAR_abovemarket_com.crt
# my_remote_filename_for_ca_bundle: STAR_abovemarket_com.ca-bundle
# my_remote_filename_for_pem: STAR_abovemarket_com.pem
# my_remote_filename_for_key: STAR_abovemarket_com.key

# Create new CentOS 7 box, then:

ssh root@my_ip_address
passwd
useradd my_first_not_root_user
passwd my_first_not_root_user
visudo # Add "my_first_not_root_user ALL=(ALL) ALL" after "root"
nano /etc/ssh/sshd_config # Update "Port" to my_ssh_port
systemctl restart sshd.service
vim myfirewall

# myfirewall TEMPLATE TEXT OPEN

#!/bin/bash
#
# iptables example configuration script
#
# Flush all current rules from iptables
#
iptables -F
#
#  Allows all loopback (lo0) traffic and drop all traffic to 127/8 that doesn't use lo0
iptables -A INPUT -i lo -j ACCEPT
iptables -A INPUT ! -i lo -d 127.0.0.0/8 -j REJECT
#
#
#  Accepts all established inbound connections
iptables -A INPUT -m state --state ESTABLISHED,RELATED -j ACCEPT
#
#
#  Allows all outbound traffic
#  You can modify this to only allow certain traffic
iptables -A OUTPUT -j ACCEPT
#
#
# Allows HTTP and HTTPS connections from anywhere (the normal ports for websites)
iptables -A INPUT -p tcp --dport 80 -j ACCEPT
iptables -A INPUT -p tcp --dport 443 -j ACCEPT
#
#
#  Allows SSH connections
#
# THE -dport NUMBER IS THE SAME ONE YOU SET UP IN THE SSHD_CONFIG FILE
#
iptables -A INPUT -p tcp -m state --state NEW --dport my_ssh_port -j ACCEPT
#
#
# Allow ping
iptables -A INPUT -p icmp -m icmp --icmp-type 8 -j ACCEPT
#
#
# log iptables denied calls
iptables -A INPUT -m limit --limit 5/min -j LOG --log-prefix "iptables denied: " --log-level 7
#
#
# Reject all other inbound - default deny unless explicitly allowed policy
iptables -A INPUT -j REJECT
iptables -A FORWARD -j REJECT
#
#
# Save settings
#
/sbin/service iptables save
#
# List rules
#
iptables -L -v
#

# myfirewall TEMPLATE TEXT CLOSE

chmod +x myfirewall
./myfirewall
yum update
yum install httpd # Apache
yum install mysql # For release purposes needed on app server
yum install php php-mysql # The mother ship
yum install php-gd # Needed for app server image processing functions to work
yum install git
yum install mod_ssl openssl
systemctl enable httpd.service # So that it will automatically start after a reboot
exit
scp -P my_ssh_port ~/.ssh/id_rsa.pub root@my_ip_address:my_machine_id_rsa.pub
ssh -p my_ssh_port root@my_ip_address
cat my_machine_id_rsa.pub >> ~/.ssh/authorized_keys
chmod 700 ~/.ssh
chmod 600 ~/.ssh/authorized_keys
restorecon -Rv ~/.ssh  # Ensure the correct SELinux contexts are set
exit
scp -P my_ssh_port ~/.ssh/id_rsa.pub admin@my_ip_address:my_machine_id_rsa.pub
ssh -p my_ssh_port admin@my_ip_address
cat my_machine_id_rsa.pub >> ~/.ssh/authorized_keys
chmod 700 ~/.ssh
chmod 600 ~/.ssh/authorized_keys
restorecon -Rv ~/.ssh  # Ensure the correct SELinux contexts are set
ssh-keygen -t rsa -C "my_server_admin_email_address"
cat /home/my_first_not_root_user/.ssh/id_rsa.pub

# Then, go to: https://bitbucket.org/my_bitbucket_project_1_owner_username/my_bitbucket_project_1_name/admin/deploy-keys
# and add the key as "my_first_not_root_user@my_ip_address"

# Then, go to: https://bitbucket.org/my_bitbucket_project_2_owner_username/my_bitbucket_project_2_name/admin/deploy-keys
# and add the key as "my_first_not_root_user@my_ip_address"

exit

# Copy your SSL certificate file and the certificate bundle file to your Apache server.
# You should already have a key file on the server from when you generated your certificate
# request. If not, transfer that too.

scp -P my_ssh_port my_local_path_to_wildcard_crt root@my_ip_address:my_remote_filename_for_wildcard_crt
scp -P my_ssh_port my_local_path_to_wildcard_ca_bundle root@my_ip_address:my_remote_filename_for_ca_bundle
scp -P my_ssh_port my_local_path_to_wildcard_pem root@my_ip_address:my_remote_filename_for_pem
scp -P my_ssh_port my_local_path_to_wildcard_key root@my_ip_address:my_remote_filename_for_key
ssh -p my_ssh_port root@my_ip_address
mv my_remote_filename_for_wildcard_crt /etc/pki/tls/certs/my_remote_filename_for_wildcard_crt
mv my_remote_filename_for_ca_bundle /etc/pki/tls/certs/my_remote_filename_for_ca_bundle
mv my_remote_filename_for_pem /etc/pki/tls/private/my_remote_filename_for_pem
mv my_remote_filename_for_key /etc/pki/tls/private/my_remote_filename_for_key
vim +/SSLCertificateFile /etc/httpd/conf.d/ssl.conf

# Update file like so:
SSLCertificateFile /etc/pki/tls/certs/my_remote_filename_for_wildcard_crt
SSLCertificateKeyFile /etc/pki/tls/private/my_remote_filename_for_key
SSLCACertificateFile /etc/pki/tls/certs/my_remote_filename_for_ca_bundle

systemctl restart httpd.service
mkdir -p /home/admin/my_bitbucket_project_1_name
mkdir -p /home/admin/my_bitbucket_project_2_name
chown -R my_first_not_root_user:my_first_not_root_user /home/admin/my_bitbucket_project_1_name
chown -R my_first_not_root_user:my_first_not_root_user /home/admin/my_bitbucket_project_2_name

su my_first_not_root_user
cd /home/admin/my_bitbucket_project_1_name
git clone git@bitbucket.org:my_bitbucket_project_1_owner_username/my_bitbucket_project_1_name.git .
cd /home/admin/my_bitbucket_project_2_name
git clone git@bitbucket.org:my_bitbucket_project_2_owner_username/my_bitbucket_project_2_name.git .
exit
mkdir /etc/httpd/sites-available
mkdir /etc/httpd/sites-enabled
vim /etc/httpd/conf/httpd.conf

# Add the following line to the end of the file:
IncludeOptional sites-enabled/*.conf

vim /etc/httpd/sites-available/my_bitbucket_project_1_name.conf

# Add the following text:
<VirtualHost *:80>
    ServerName www.my_bitbucket_project_1_name
    ServerAlias my_bitbucket_project_1_name
    DocumentRoot /home/admin/my_bitbucket_project_1_name/www
    ErrorLog /home/admin/my_bitbucket_project_1_name_error.log
    CustomLog /home/admin/my_bitbucket_project_1_name_requests.log combined
</VirtualHost>

<VirtualHost *:443>
    ServerName www.my_bitbucket_project_1_name
    ServerAlias my_bitbucket_project_1_name
    DocumentRoot /home/admin/my_bitbucket_project_1_name/www
    ErrorLog /home/admin/my_bitbucket_project_1_name_error.log
    CustomLog /home/admin/my_bitbucket_project_1_name_requests.log combined
</VirtualHost>

vim /etc/httpd/sites-available/my_bitbucket_project_2_name.conf

# Add the following text:
<VirtualHost *:80>
    ServerName www.my_bitbucket_project_2_name
    ServerAlias my_bitbucket_project_2_name
    DocumentRoot /home/admin/my_bitbucket_project_2_name/www
    ErrorLog /home/admin/my_bitbucket_project_2_name_error.log
    CustomLog /home/admin/my_bitbucket_project_2_name_requests.log combined
</VirtualHost>

<VirtualHost *:443>
    ServerName www.my_bitbucket_project_2_name
    ServerAlias my_bitbucket_project_2_name
    DocumentRoot /home/admin/my_bitbucket_project_2_name/www
    ErrorLog /home/admin/my_bitbucket_project_2_name_error.log
    CustomLog /home/admin/my_bitbucket_project_2_name_requests.log combined
</VirtualHost>

ln -s /etc/httpd/sites-available/my_bitbucket_project_1_name.conf /etc/httpd/sites-enabled/my_bitbucket_project_1_name.conf
ln -s /etc/httpd/sites-available/my_bitbucket_project_2_name.conf /etc/httpd/sites-enabled/my_bitbucket_project_2_name.conf
apachectl restart

# Make sure you've mapped your DNS records to point to my_ip_address for each of
# the project names/domains you setup.

# Boom, you're done.
Thursday, October 9, 2014
How does one go about creating a softlink?
ln -s ~/Dropbox/secure/project/_development.yaml clitools/_development.yaml
ln -s ~/Dropbox/secure/project/_local.yaml clitools/_local.yaml
ln -s ~/Dropbox/secure/project/_production.yaml clitools/_production.yaml
ln -s ~/Dropbox/secure/project/_release.yaml clitools/_release.yaml
Monday, September 22, 2014
Sunday, June 22, 2014
What's the best blog post in the world for teaching you the ways of iOS's autolayout, storyboards, and scroll views that contain many subviews that, by default, don't have their own intrinsic content size?
Saturday, April 26, 2014
What should I do after ordering a CentOS 6.5 server?
Okay, so I know how to do this on a Debian 7 box. However, I've never done server setup on a CentOS machine, until now. Here's a post I did on how to setup a Debian 7 box: http://oneqonea.blogspot.com/2013/04/how-do-i-set-up-next-generation.html. This post is based on that one. I'm following the other post as a conceptual guide and using this one to capture my translation process.
ssh root@youripaddress
Changing the root user's password was the same between Debian and CentOS:
passwd
Instead of "adduser admin" it was "useradd youruser". In CentOS you need to follow "useradd youruser" with "passwd youruser" Reference: https://www.centos.org/docs/5/html/5.1/Deployment_Guide/s2-users-add.html Also note this is a decent article too: https://www.digitalocean.com/community/articles/initial-server-setup-with-centos-6
visudo process was the same between Debian and CentOS (i.e. making youruser have sudo privileges):
Updating the ssh port number was the same between Debian and CentOS. However, Debian has PasswordAuthentication commented out (set to no) while CentOS defaults to PasswordAuthentication yes.
vim /etc/ssh/sshd_config
"Update your port number to something unique such as 7919" Save the file (ZZ).
How to restart the ssh service varied slightly: http://www.cyberciti.biz/faq/howto-restart-ssh/. The CentOS way is: /etc/init.d/sshd restart
In terms of how to configure iptables. Things were different. I implemented the same rules but the steps were as follows (inspired by http://wiki.centos.org/HowTos/Network/IPTables):
Okay so the next steps vary slightly depending on whether or not we're setting up an app/web server or a database server. App/web gets apache and php. Database gets mysql.
By default MySQL Server Version 5.1.73 is installed. I need newer than that. I followed this tutorial: http://webees.me/how-to-install-php-5-4-and-mysql-5-5-in-centos-6-4-via-yum/ (my app requires 5.5 or higher for utf8 character reasons).
Okay, so if you're setting up a server that uses PHP's imagecreatefromjpeg function then you need gd. Since the php we just installed doesn't have gd we run the following command to add it:
yum --enablerepo=epel,remi,rpmforge install gd gd-devel php-gd
/etc/init.d/httpd restart
ssh root@youripaddress
Changing the root user's password was the same between Debian and CentOS:
passwd
Instead of "adduser admin" it was "useradd youruser". In CentOS you need to follow "useradd youruser" with "passwd youruser" Reference: https://www.centos.org/docs/5/html/5.1/Deployment_Guide/s2-users-add.html Also note this is a decent article too: https://www.digitalocean.com/community/articles/initial-server-setup-with-centos-6
visudo process was the same between Debian and CentOS (i.e. making youruser have sudo privileges):
youruser ALL=(ALL) ALL
Updating the ssh port number was the same between Debian and CentOS. However, Debian has PasswordAuthentication commented out (set to no) while CentOS defaults to PasswordAuthentication yes.
vim /etc/ssh/sshd_config
"Update your port number to something unique such as 7919" Save the file (ZZ).
How to restart the ssh service varied slightly: http://www.cyberciti.biz/faq/howto-restart-ssh/. The CentOS way is: /etc/init.d/sshd restart
In terms of how to configure iptables. Things were different. I implemented the same rules but the steps were as follows (inspired by http://wiki.centos.org/HowTos/Network/IPTables):
- I logged in as the root user
- I created a file called myfirewall and gave it the execute bit: chmod +x myfirewall
- vim myfirewall and copy and paste (with ssh port edits that sync with /etc/ssh/sshd_config edits) the following text into it and then save and close: http://oneqonea.blogspot.com/2014/04/myfirewall-file.html
- As the root user run: ./myfirewall Then, boom. You're locked and loaded.
- Clears rules then resets them. This executes the iptables init script, which runs /sbin/iptables-save and writes the current iptables configuration to /etc/sysconfig/iptables. Upon reboot, the iptables init script reapplies the rules saved in /etc/sysconfig/iptables by using the /sbin/iptables-restore command.
If you're still logged in as root, instead of "aptidude update" run "yum update" (add sudo if you're not root). Reference: https://www.centos.org/forums/viewtopic.php?t=39652
Okay so the next steps vary slightly depending on whether or not we're setting up an app/web server or a database server. App/web gets apache and php. Database gets mysql.
Here's good article for getting Apache, PHP, and MySQL installed: https://www.digitalocean.com/community/articles/how-to-install-linux-apache-mysql-php-lamp-stack-on-centos-6. Install the right software given the type of machine you're setting up. Note that if you're setting up an app server that runs an app that connects to a mysql database, that you'll need to install mysql on the app server even if you're connecting to a remote mysql database (for release purposes).
App server command brief:
yum install httpd # Already installed
yum install mysql # For release purposes needed on app server
yum install php php-mysql # The mother ship
yum install php-gd # Needed for app server image processing functions to work
Note, after you install MySQL run: service mysqld start
App server command brief:
yum install httpd # Already installed
yum install mysql # For release purposes needed on app server
yum install php php-mysql # The mother ship
yum install php-gd # Needed for app server image processing functions to work
Note, after you install MySQL run: service mysqld start
By default PHP Version 5.3.3 is installed. I need newer than that. I followed this tutorial: http://webees.me/how-to-install-php-5-4-and-mysql-5-5-in-centos-6-4-via-yum/
By default MySQL Server Version 5.1.73 is installed. I need newer than that. I followed this tutorial: http://webees.me/how-to-install-php-5-4-and-mysql-5-5-in-centos-6-4-via-yum/ (my app requires 5.5 or higher for utf8 character reasons).
Okay, so if you're setting up a server that uses PHP's imagecreatefromjpeg function then you need gd. Since the php we just installed doesn't have gd we run the following command to add it:
yum --enablerepo=epel,remi,rpmforge install gd gd-devel php-gd
/etc/init.d/httpd restart
After doing all that I setup ssh keys (and optionally turn password access off) for both machines. I followed this tutorial: http://wiki.centos.org/HowTos/Network/SecuringSSH#head-9c5717fe7f9bb26332c9d67571200f8c1e4324bc
Then I installed git via: yum install git
Then I create a key-pair on the server:
ssh-keygen -t rsa -C "your_email@example.com"
Save in default location and skip the passphrase.
Now add your id_rsa.pub file content to Bitbucket as a deploy key: https://bitbucket.org/acctowner/projectname/admin/deploy-keys. I like to label my key using machine IP address. To get key:
cat ~/.ssh/id_rsa.pub
After doing that I git cloned project source files from their Bitbucket home to a folder within admin's home directory:
git clone git@bitbucket.org:acctowner/projectname.git
Then I installed a wild card ssl cert by loading the .crt and .key files to the remote machine like so: http://wiki.centos.org/HowTos/Https. Note that I skipped part three and didn't do anything special with virtual hosts. Command recap:
Now on to setting up the apache hosting environment:
sudo vim /etc/httpd/conf/httpd.conf
#DocumentRoot "/var/www/html"
DocumentRoot "/home/youruser/yourproject/www"
#<Directory "/var/www/html">
<Directory "/home/youruser/yourproject/www">
# For CodeIgniter, faster than .htaccess file
RewriteEngine On
RewriteBase /
RewriteCond %{REQUEST_FILENAME} !-f
RewriteCond %{REQUEST_FILENAME} !-d
RewriteRule ^(.*)$ index.php?/$1 [L]
sudo /etc/init.d/httpd restart
You will experience a 403 Forbidden error on refresh.
I found the steps I needed to follow here: https://drupal.org/node/244924
$ cd /home/youruser/yourproject
$ sudo chown -R youruser:apache .
$ sudo find . -type d -exec chmod u=rwx,g=rx,o= '{}' \;
$ sudo find . -type f -exec chmod u=rw,g=r,o= '{}' \;
$ sudo chmod 711 /home/youruser
Then 770 the dirs you need apache to be able to write to (temp, runtime, logs, etc).
chmod 770 yourproject/application/logs/
To enable CodeIgniter app to be able to write files to the app's default log dir.
chmod 770 yourproject/application/runtime
chmod 770 yourproject/application/runtime/img
chmod 770 yourproject/www/images/local_cdn
A reminder for myself to enable app specific write dirs.
sudo vim /etc/php.ini
Then update php's memory limit from its default of 128M to something bigger like so:
sudo vim /etc/php.ini
;memory_limit = 128M
;
;johnerck says: free -m prints "Mem: free 6290" so I figure we can alloc 4000MB
memory_limit = 4000M
; Maximum allowed size for uploaded files.
; http://php.net/upload-max-filesize
;upload_max_filesize = 2M
upload_max_filesize = 100M
; http://php.net/post-max-size
;post_max_size = 8M
post_max_size = 100M
;error_log = php_errors.log
error_log = /home/youruser/php_error.log
Save the file (ZZ).
Now create the log file we just referenced in our php.ini edits:
vim /home/youruser/php_error.log
/*Add some content such as "php_error.log" and save (ZZ)*/
Make sure the log file just created is 664 and "sudo chown youruser:apache php_error.log"
sudo /etc/init.d/httpd restart
Ok, we are for sure linked in with php errors!! It's been tested!! For example, if there is a syntax error in your php code, such as a missing semicolon, php will log the error to /home/youruser/php_error.log. You can tail -f /home/youruser/php_error.log and then refresh the browser on a page with a known missing semicolon and you will see the error write to the terminal (and filesystem). This is great.
If you're hosting a CodeIgniter app like I am then you'll want to check the following:
Make sure $config['log_threshold'] is >= 1 (so that it does actually log to the file system).
Note that in addition to the php error logs we just finished setting up, Apache also has an error log that can be viewed here: sudo cat /var/log/httpd/error_log
Next I needed to setup clitools and deploy with secure config file to fix the following error message from our API codebase: "The application environment is not set correctly.". I installed clitools, filled out the _*.yaml files and then ran a clitools/releaseto production.
I then needed to get the database server further setup:
http://www.rackspace.com/knowledge_center/article/installing-mysql-server-on-centos
Where they were doing "'demouser'@'localhost'" I was doing "'myuser'@'%'" so it can access remotely. I like this guy's recommendation regarding performance and iptables: http://www.noelherrick.com/blog/creating-users-granting-permissions-in-mysql
For a simple localhost setup you'll likely run the following commands in this order:
Now I'm going to see if I can get the two boxes to talk to each other over the SoftLayer private network. Okay, yup, they're talking.
Then I installed git via: yum install git
Then I create a key-pair on the server:
ssh-keygen -t rsa -C "your_email@example.com"
Save in default location and skip the passphrase.
Now add your id_rsa.pub file content to Bitbucket as a deploy key: https://bitbucket.org/acctowner/projectname/admin/deploy-keys. I like to label my key using machine IP address. To get key:
cat ~/.ssh/id_rsa.pub
After doing that I git cloned project source files from their Bitbucket home to a folder within admin's home directory:
git clone git@bitbucket.org:acctowner/projectname.git
Then I installed a wild card ssl cert by loading the .crt and .key files to the remote machine like so: http://wiki.centos.org/HowTos/Https. Note that I skipped part three and didn't do anything special with virtual hosts. Command recap:
$ sudo yum install mod_ssl openssl
$ exit
$ scp -P 1234 ~/your/cert/on/your/comp/STAR_domain_com/STAR_domain_com.crt root@youripaddress:STAR_domain_com.crt
$ scp -P 1234 ~/your/cert/on/your/comp/STAR_domain_com/STAR_domain_com.key root@youripaddress:STAR_domain_com.key
$ ssh -p 1234 root@youripaddress
$ mv STAR_domain_com.crt /etc/pki/tls/certs/STAR_domain_com.crt
$ mv STAR_domain_com.key /etc/pki/tls/private/STAR_domain_com.key
$ vim +/SSLCertificateFile /etc/httpd/conf.d/ssl.conf # Update certificate paths
$ /etc/init.d/httpd restart
Now on to setting up the apache hosting environment:
sudo vim /etc/httpd/conf/httpd.conf
#DocumentRoot "/var/www/html"
DocumentRoot "/home/youruser/yourproject/www"
#<Directory "/var/www/html">
<Directory "/home/youruser/yourproject/www">
# For CodeIgniter, faster than .htaccess file
RewriteEngine On
RewriteBase /
RewriteCond %{REQUEST_FILENAME} !-f
RewriteCond %{REQUEST_FILENAME} !-d
RewriteRule ^(.*)$ index.php?/$1 [L]
sudo /etc/init.d/httpd restart
You will experience a 403 Forbidden error on refresh.
I found the steps I needed to follow here: https://drupal.org/node/244924
$ cd /home/youruser/yourproject
$ sudo chown -R youruser:apache .
$ sudo find . -type d -exec chmod u=rwx,g=rx,o= '{}' \;
$ sudo find . -type f -exec chmod u=rw,g=r,o= '{}' \;
$ sudo chmod 711 /home/youruser
Then 770 the dirs you need apache to be able to write to (temp, runtime, logs, etc).
chmod 770 yourproject/application/logs/
To enable CodeIgniter app to be able to write files to the app's default log dir.
chmod 770 yourproject/application/runtime
chmod 770 yourproject/application/runtime/img
chmod 770 yourproject/www/images/local_cdn
A reminder for myself to enable app specific write dirs.
sudo vim /etc/php.ini
Then update php's memory limit from its default of 128M to something bigger like so:
sudo vim /etc/php.ini
;memory_limit = 128M
;
;johnerck says: free -m prints "Mem: free 6290" so I figure we can alloc 4000MB
memory_limit = 4000M
; Maximum allowed size for uploaded files.
; http://php.net/upload-max-filesize
;upload_max_filesize = 2M
upload_max_filesize = 100M
; http://php.net/post-max-size
;post_max_size = 8M
post_max_size = 100M
;error_log = php_errors.log
error_log = /home/youruser/php_error.log
Save the file (ZZ).
Now create the log file we just referenced in our php.ini edits:
vim /home/youruser/php_error.log
/*Add some content such as "php_error.log" and save (ZZ)*/
Make sure the log file just created is 664 and "sudo chown youruser:apache php_error.log"
sudo /etc/init.d/httpd restart
Ok, we are for sure linked in with php errors!! It's been tested!! For example, if there is a syntax error in your php code, such as a missing semicolon, php will log the error to /home/youruser/php_error.log. You can tail -f /home/youruser/php_error.log and then refresh the browser on a page with a known missing semicolon and you will see the error write to the terminal (and filesystem). This is great.
If you're hosting a CodeIgniter app like I am then you'll want to check the following:
Make sure $config['log_threshold'] is >= 1 (so that it does actually log to the file system).
Note that in addition to the php error logs we just finished setting up, Apache also has an error log that can be viewed here: sudo cat /var/log/httpd/error_log
Next I needed to setup clitools and deploy with secure config file to fix the following error message from our API codebase: "The application environment is not set correctly.". I installed clitools, filled out the _*.yaml files and then ran a clitools/releaseto production.
I then needed to get the database server further setup:
http://www.rackspace.com/knowledge_center/article/installing-mysql-server-on-centos
Where they were doing "'demouser'@'localhost'" I was doing "'myuser'@'%'" so it can access remotely. I like this guy's recommendation regarding performance and iptables: http://www.noelherrick.com/blog/creating-users-granting-permissions-in-mysql
For a simple localhost setup you'll likely run the following commands in this order:
mysql -uroot -p
SELECT User, Host, Password FROM mysql.user; -- Shows current state
CREATE DATABASE demodb;
INSERT INTO mysql.user (User,Host,Password) VALUES('demodbuser','localhost',PASSWORD('yourfancypassword'));
FLUSH PRIVILEGES;
SELECT User, Host, Password FROM mysql.user; -- Shows current state
GRANT ALL PRIVILEGES ON demodb.* to demodbuser@localhost;
FLUSH PRIVILEGES;
SHOW GRANTS FOR 'demodbuser'@'localhost'; -- Shows current state
What does my default CentOS iptables firewall file look like?
CentOS myfirewall template file:
#!/bin/bash
#
# iptables example configuration script
#
# Flush all current rules from iptables
#
iptables -F
#
#  Allows all loopback (lo0) traffic and drop all traffic to 127/8 that doesn't use lo0
iptables -A INPUT -i lo -j ACCEPT
iptables -A INPUT ! -i lo -d 127.0.0.0/8 -j REJECT
#
#
#  Accepts all established inbound connections
iptables -A INPUT -m state --state ESTABLISHED,RELATED -j ACCEPT
#
#
#  Allows all outbound traffic
#  You can modify this to only allow certain traffic
iptables -A OUTPUT -j ACCEPT
#
#
# Allows HTTP and HTTPS connections from anywhere (the normal ports for websites)
iptables -A INPUT -p tcp --dport 80 -j ACCEPT
iptables -A INPUT -p tcp --dport 443 -j ACCEPT
#
#
#  Allows SSH connections
#
# THE -dport NUMBER IS THE SAME ONE YOU SET UP IN THE SSHD_CONFIG FILE
#
iptables -A INPUT -p tcp -m state --state NEW --dport 7921 -j ACCEPT
#
#
# Allow ping
iptables -A INPUT -p icmp -m icmp --icmp-type 8 -j ACCEPT
#
#
# log iptables denied calls
iptables -A INPUT -m limit --limit 5/min -j LOG --log-prefix "iptables denied: " --log-level 7
#
#
# Reject all other inbound - default deny unless explicitly allowed policy
iptables -A INPUT -j REJECT
iptables -A FORWARD -j REJECT
#
#
# Save settings
#
/sbin/service iptables save
#
# List rules
#
iptables -L -v
#
Friday, February 21, 2014
Wednesday, January 8, 2014
How to delete outdated provisioning profiles from Xcode 5
You can delete the files directly from ~/Library/MobileDevice/Provisioning Profiles
Open finder, ⌘-Shift-G, and paste in the above path. Restart Xcode afterward.
Open finder, ⌘-Shift-G, and paste in the above path. Restart Xcode afterward.
UIScrollView and Autolayout Demystified
Just finished reading and implementing the described examples in the following link:
Chapter 20. Scroll Views
I was very impressed with this thorough yet easy to read description of how scroll views work.
Chapter 20. Scroll Views
I was very impressed with this thorough yet easy to read description of how scroll views work.
Thursday, December 12, 2013
Objective C, JSON APIs and a few details worth noting...
Types that can be returned by JSON API:
When parsing JSON with Objective C's NSJSONSerialization class we get the following conversions:
*Note that boolean to NSNumber will NSLog itself as __NSCFBoolean. What?! We just noted above that booleans get parsed as NSNumbers!! Okay, settle, it all does make sense with a little further explanation; __NSCFBoolean is a private class that is used in the NSNumber class cluster. Don't concern yourself with it. Understand that JSON response fields containing a boolean will get parsed as an NSNumber and that to check the parsed value for its meaning (i.e. true/false) you can NOT do if (myBoolean) or if (!myBoolean). Instead, you need to check if ([myBoolean boolValue]) or if (![myBoolean boolValue]) respectively.
*Note that null to NSNull is different than what you might hope for (null to nil). If you send a message to NSNull that it doesn't understand (this is easy to do if you're working with an optional string field), NSNull will crash your app (as opposed to just returning nil). Yikes!
So, how does it all add up? Well, from my experience as a PHP programmer, API developer, and iOS client creator... I'd break it down like this:
Strings, numbers, booleans, and nulls all serve a purpose on the server (both the backend database and API application layer (PHP)). For example, null means a value that hasn't yet been defined. We write queries using null, do special application logic based on it (i.e. send an email where we otherwise wouldn't, etc). It's true that in some cases the null value might even be important to the client, and if so, could be passed on through. However, from my experience, it rarely is. With Objective C being a strongly typed language and the risk of crashing being very real, I've found that I like writing APIs that simplify their output to just strings. 99% of the time, even when receiving a number from the API, I am getting it so I can display it in the UI (i.e. I need it as a string). Therefore the simplicity of working with an all strings API is wonderful and also helps avoid app crashes. I even like to switch my boolean values to strings and just use yes or no. I like the way it reads and keeps the entire API as strings only.
It's all about style. For me, I've found simplifying my API output makes for an easier to use JSON API for my iOS apps.
- string
- number
- boolean
- null
When parsing JSON with Objective C's NSJSONSerialization class we get the following conversions:
- string (NSString)
- number (NSNumber)
- boolean (NSNumber*)
- null (NSNull*)
*Note that boolean to NSNumber will NSLog itself as __NSCFBoolean. What?! We just noted above that booleans get parsed as NSNumbers!! Okay, settle, it all does make sense with a little further explanation; __NSCFBoolean is a private class that is used in the NSNumber class cluster. Don't concern yourself with it. Understand that JSON response fields containing a boolean will get parsed as an NSNumber and that to check the parsed value for its meaning (i.e. true/false) you can NOT do if (myBoolean) or if (!myBoolean). Instead, you need to check if ([myBoolean boolValue]) or if (![myBoolean boolValue]) respectively.
*Note that null to NSNull is different than what you might hope for (null to nil). If you send a message to NSNull that it doesn't understand (this is easy to do if you're working with an optional string field), NSNull will crash your app (as opposed to just returning nil). Yikes!
So, how does it all add up? Well, from my experience as a PHP programmer, API developer, and iOS client creator... I'd break it down like this:
Strings, numbers, booleans, and nulls all serve a purpose on the server (both the backend database and API application layer (PHP)). For example, null means a value that hasn't yet been defined. We write queries using null, do special application logic based on it (i.e. send an email where we otherwise wouldn't, etc). It's true that in some cases the null value might even be important to the client, and if so, could be passed on through. However, from my experience, it rarely is. With Objective C being a strongly typed language and the risk of crashing being very real, I've found that I like writing APIs that simplify their output to just strings. 99% of the time, even when receiving a number from the API, I am getting it so I can display it in the UI (i.e. I need it as a string). Therefore the simplicity of working with an all strings API is wonderful and also helps avoid app crashes. I even like to switch my boolean values to strings and just use yes or no. I like the way it reads and keeps the entire API as strings only.
It's all about style. For me, I've found simplifying my API output makes for an easier to use JSON API for my iOS apps.
Wednesday, September 25, 2013
Saturday, September 7, 2013
How can I get certain domain names to resolve locally using Mac OS X?
By default, all domain names will be looked up via online DNS servers. To resolve locally, we need to override this behavior. We do this by editing our /etc/hosts file. Open it (you'll be prompted for your password). In order to get a certain domain name, say example.com, to resolve locally, add a line that looks like this:
127.0.0.1 examplesite.comThe 127.0.0.1 means localhost. examplesite.com should be replaced with your domain name. Upon saving the document, changes will be made live immediately. There is no need to flush cache or anything of that sort. Happy coding locally!
Monday, May 6, 2013
How do I determine the version of Apache installed on a Debian based Linux machine?
Run the following command:
sudo apachectl -VWhich will print something similar to:
Server version: Apache/2.2.16 (Debian)
Server built:   Mar  3 2013 12:09:44
Server's Module Magic Number: 20051115:24
Server loaded:  APR 1.4.2, APR-Util 1.3.9
Compiled using: APR 1.4.2, APR-Util 1.3.9
Architecture:   64-bit
Server MPM:     Prefork
  threaded:     no
    forked:     yes (variable process count)
Server compiled with....
 -D APACHE_MPM_DIR="server/mpm/prefork"
 -D APR_HAS_SENDFILE
 -D APR_HAS_MMAP
 -D APR_HAVE_IPV6 (IPv4-mapped addresses enabled)
 -D APR_USE_SYSVSEM_SERIALIZE
 -D APR_USE_PTHREAD_SERIALIZE
 -D SINGLE_LISTEN_UNSERIALIZED_ACCEPT
 -D APR_HAS_OTHER_CHILD
 -D AP_HAVE_RELIABLE_PIPED_LOGS
 -D DYNAMIC_MODULE_LIMIT=128
 -D HTTPD_ROOT="/etc/apache2"
 -D SUEXEC_BIN="/usr/lib/apache2/suexec"
 -D DEFAULT_PIDLOG="/var/run/apache2.pid"
 -D DEFAULT_SCOREBOARD="logs/apache_runtime_status"
 -D DEFAULT_LOCKFILE="/var/run/apache2/accept.lock"
 -D DEFAULT_ERRORLOG="logs/error_log"
 -D AP_TYPES_CONFIG_FILE="mime.types"
 -D SERVER_CONFIG_FILE="apache2.conf"
Wednesday, May 1, 2013
How do I create a Facebook web app using CodeIgniter?
First things first, this tutorial assumes you have the following setup:

 Next, pass through the security check:
 Great. Now fill out the rest of your application's profile as shown in this screenshot:
 After clicking "Save Change" you'll see the following success message:

Okay, now download the latest version of CodeIgniter:
 Then unzip your download:
 Then add your own web root dir named "www" and rename your CI parent folder to your app's domain name:
 Move the folder to your home directory:

Okay, now spin up a new web server:

Next, config your DNS:
 Now open up Terminal and cd into your project directory.
 After walking through the process pictured above twice (once locally, and once on your remote production machine), open the following two files:

The rest of this post is going to assume you have an empty database setup in both your local and remote environments and that you've properly filled out your _env.php and _release.php files.
We'll continue to use clitools throughout this tutorial but now is a good time to mention that you can read more about clitools at clitools.org.
Ok, back to the task at hand. Your local database should look like this:
 Now again, on your local machine, run the following command:
 If you click into the version table you'll see:

Next, create a BitBucket (or GitHub) project repo:
 Next, on your local machine, go to the root of your project dir via the following command:
Now that you're on your remote machine, run the following command:
This tutorial assumes you have your remote apache server environment set up properly. You can exit your remote machine:
You can run a git status just to see where we're at right now.
Run the following command:
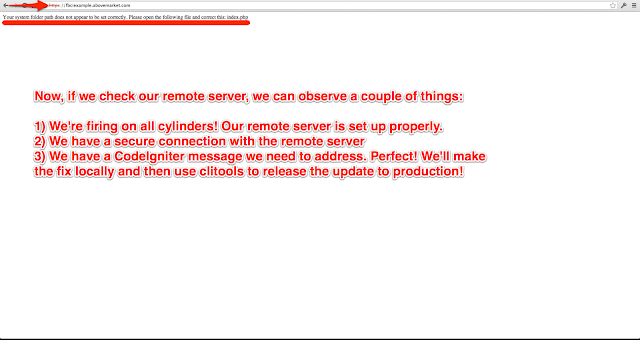 On your local machine, run the following command:
 Congrats! You're on fire!
Want pretty URLs? Me too. Add the following .htaccess file in www/:
- A Mac
- A remote server running Debian 6.06 (Squeeze)
- A Facebook account
- And a copy of MAMP Pro running on your local machine
Okay, first we need to create a Facebook app. Go here: https://developers.facebook.com/apps?ref=bookmarks&count=0&fb_source=bookmark_apps&fb_bmpos=6_0 (and for the record, yes, I think that's a totally weird looking URL). Then, click the "Create New App" button as shown in the following screenshot:

Next, name your app and then click the "Continue" button:


Okay, now download the latest version of CodeIgniter:


Okay, now spin up a new web server:

Next, config your DNS:

cd ~/fbciexample.abovemarket.comNow run the following command:
git initYou'll see the following output:
Initialized empty Git repository in /Users/johnerck/fbciexample.abovemarket.com/.git/Next, add clitools for release management. If you don't already have clitools on your local machine, run the following command to git clone it to your home directory:
git clone git@bitbucket.org:abovemarket/clitools.org.git ~/clitools.orgYou'll see the following output:
Cloning into '/Users/johnerck/clitools.org'...
remote: Counting objects: 132, done.
remote: Compressing objects: 100% (112/112), done.
remote: Total 132 (delta 41), reused 0 (delta 0)
Receiving objects: 100% (132/132), 256.54 KiB, done.
Resolving deltas: 100% (41/41), done.
Okay, after running that command, run this next:
php ~/clitools.org/clitools/installto.php ~/fbciexample.abovemarket.com/clitoolsYou'll see the following output:
Success: You've successfully installed clitools to ~/fbciexample.abovemarket.com/clitools/Okay, now it's time to create both our local and remote databases:

open ~/fbciexample.abovemarket.com/clitools/_env.php
open ~/fbciexample.abovemarket.com/clitools/_release.php
Add your database credentials as illustrated:

The rest of this post is going to assume you have an empty database setup in both your local and remote environments and that you've properly filled out your _env.php and _release.php files.
We'll continue to use clitools throughout this tutorial but now is a good time to mention that you can read more about clitools at clitools.org.
Ok, back to the task at hand. Your local database should look like this:

php ~/fbciexample.abovemarket.com/clitools/uschema.phpAfter running that command you should see the following output:
mysql -h localhost -u fbciexample -p********** fbciexample < ~/fbciexample.abovemarket.com/clitools/changes/schema/1.sql
Success: Your database is up to date (at 1.sql)
Files Applied:
~/fbciexample.abovemarket.com/clitools/changes/schema/1.sql
Now, if you refresh your database page it should look like this:


Next, create a BitBucket (or GitHub) project repo:

cd ~/fbciexample.abovemarket.comOkay, now run the following commands:
git remote add origin ssh://git@bitbucket.org/abovemarket/fbciexample.abovemarket.com.git
git add .
git commit -m 'Initial commit'Now open your .git/config file:
nano .git/configAdd the following lines to the end (make sure you indent using one tab rather than 4 spaces):
[branch "master"]
    remote = origin
    merge = refs/heads/master
Save the file. Push your changes:
git push -u origin --allYou'll see the following output:
Counting objects: 410, done.
Delta compression using up to 8 threads.
Compressing objects: 100% (394/394), done.
Writing objects: 100% (410/410), 2.17 MiB | 3.96 MiB/s, done.
Total 410 (delta 127), reused 0 (delta 0)
remote: bb/acl: johnerck is allowed. accepted payload.
To ssh://git@bitbucket.org/abovemarket/fbciexample.abovemarket.com.git
 * [new branch]      master -> master
Branch master set up to track remote branch master from origin.
Great. Now ssh into your remote machine:
ssh -p your_port you@your_ip_addressRemember that if you run into trouble here, it may be because you have MAMP turned on and so whatever domain you're using is resolving to localhost rather than hitting the net.
Now that you're on your remote machine, run the following command:
git clone git@bitbucket.org:abovemarket/fbciexample.abovemarket.comYou'll see the following output:
Cloning into fbciexample.abovemarket.com...
remote: Counting objects: 410, done.
remote: Compressing objects: 100% (267/267), done.
remote: Total 410 (delta 127), reused 410 (delta 127)
Receiving objects: 100% (410/410), 2.17 MiB, done.
Resolving deltas: 100% (127/127), done.
The directory created when you get cloned the project needs to match apache's web root. If you're interested in knowing how to set up vhosts, checkout a post I did awhile back on that topic: http://oneqonea.blogspot.com/2013/04/how-do-i-set-up-apache-virtual-hosts-on.html
This tutorial assumes you have your remote apache server environment set up properly. You can exit your remote machine:
exitOkay, now it's time to release our app!
You can run a git status just to see where we're at right now.
git statusIt should output:
# On branch master
nothing to commit (working directory clean)
Okay, great. Since our current branch is "clean", we know we can release. Since we're on the "master" branch, we know we're about to release master (this is the nature of clitools).
Run the following command:
php clitools/releaseto.php productionclitools will tell you what it's doing while it runs. The last line should say:
Local status: You've successfully released your project from master to production (v00.001.000)clitools just did a number of things for us. A quick review would include:
- Created a new release branch (rb00.001)
- Created a new release tag from that branch (v00.001.000)
- Ssh'd into our remote machine and checked out git tag v00.001.000
- Triggered clitools/uschema.php (updated the target machine's database)
- Triggered clitools/udata.php (php file that's available to be run on release if need be)
- Updated clitools/version.php's file content with v00.001.000
- Version stamped each change file applied (if target was "production")
- Version stamped a copy of udata's source file (regardless of target environment but only if udata's source file was not empty)
- Printed a success message to our screen and pushed the release branch to origin so the rest of our team can be in the loop!
 On your local machine, run the following command:
open ~/fbciexample.abovemarket.com/www/index.phpAdd the following lines of php code to the top of the file after the opening php tag:
require_once dirname(__FILE__) . '/../clitools/_env.php';
date_default_timezone_set('UTC'); // So we can call new DateTime();
Where the file says:
define('ENVIRONMENT', 'development');
Replace it with:
$ci_environment_translation = CLITOOLS__ENVIRONMENT === 'local' ? 'development' : CLITOOLS__ENVIRONMENT;
define('ENVIRONMENT', $ci_environment_translation);
If you want errors to get logged in production, switch production's error_reporting from error_reporting(0); to:
error_reporting(E_ALL);Now set $system_path and $application_folder like so:
$system_path = CLITOOLS__CI_SYSTEM_PATH;
$application_folder = CLITOOLS__CI_APPLICATION_FOLDER;
Now open your clitools/_env.php file:
open ~/fbciexample.abovemarket.com/clitools/_env.phpAdd the following lines to your _env.php file (but translated for YOUR local machine of course):
define('CLITOOLS__CI_SYSTEM_PATH', '/Users/johnerck/fbciexample.abovemarket.com/system');
define('CLITOOLS__CI_APPLICATION_FOLDER', '/Users/johnerck/fbciexample.abovemarket.com/application');
Now open your clitools/_release.php file:
open ~/fbciexample.abovemarket.com/clitools/_release.phpAdd the following lines to your _release.php file's $content var (but translated for YOUR remote machine of course):
"define('CLITOOLS__CI_SYSTEM_PATH', '/home/admin/fbciexample.abovemarket.com/system');
define('CLITOOLS__CI_APPLICATION_FOLDER', '/home/admin/fbciexample.abovemarket.com/application');"
Now run:
git status
git add .
git commit -m 'Updated some environment related settings (i.e. fixed bug in app)'
git push
php clitools/releaseto.php productionclitools will tell you what it's doing while it runs. The last line should say:
Local status: You've successfully released your project from master to production (v00.002.000)Now access your fbciexample.abovemarket.com

Want pretty URLs? Me too. Add the following .htaccess file in www/:
RewriteEngine On
RewriteBase /
RewriteCond %{REQUEST_FILENAME} !-f
RewriteCond %{REQUEST_FILENAME} !-d
RewriteRule ^(.*)$ index.php?/$1 [L]
Then
open application/config/config.phpand update to:
$config['index_page'] = ''; // Was previously 'index.php'That's all for now. At a future date I'll extend this post to show you how to install Sparks (SolidSess to be exact). That's where FB comes into the mix too! Later!
Saturday, April 27, 2013
How do I set up Apache virtual hosts on a Debian based Linux machine and configure to support HTTPS?
Preliminary quick note, if you haven't enabled ssh keys between your local machine and your remote machine, I recommend that you do. I just posted a how to on this you can check out here: http://oneqonea.blogspot.com/2013/04/how-do-i-set-up-ssh-keys-and-turn-off_27.html
Okay, now on to virtual host configuration! Connect to your remote machine (hopefully via ssh keys!):
While we're at it let's enable apache's mod_rewrite too:
Next we're going to set up our virtual hosts. Run the following command:
Now, we need to create almost the exact same thing in the same file but wrap the config settings in <VirtualHost *:443> rather than <VirtualHost *:80>, to do this easily, run the following series of commands:
Okay cool, you're back. After checking out that post you should now have your project cloned to your remote machine (i.e. the document root dir referenced in our vhost config file now points to a directory that exists).
Next, we need to edit our ports.conf file:
 Now is a good time to double check and make sure "your_site.com" points to "your_ip_address" at the DNS level. Once you've double checked that all we need to do is enable our site, disable default, and restart apache:
Put a "test" info.php file inside your project's web root:


If your screens look like my screens then you rock! Let's wrap up by removing our test file:
In a future post we'll be looking at how to add a release management library I wrote called clitools to a CodeIgniter project and doing your first release to your new machine! Stay tuned!
Okay, now on to virtual host configuration! Connect to your remote machine (hopefully via ssh keys!):
ssh -p your_port you@your_ip_addressThen run the following command:
sudo mkdir -p /etc/apache2/ssl/your_site.comThen run the following command:
sudo openssl req -new -x509 -days 365 -nodes -out /etc/apache2/ssl/your_site.com/apache.pem -keyout /etc/apache2/ssl/your_site.com/apache.pemYou'll see the following output:
Generating a 1024 bit RSA private key
..++++++
...........................++++++
writing new private key to '/etc/apache2/ssl/your_site.com/apache.pem'
-----
You are about to be asked to enter information that will be incorporated
into your certificate request.
What you are about to enter is what is called a Distinguished Name or a DN.
There are quite a few fields but you can leave some blank
For some fields there will be a default value,
If you enter '.', the field will be left blank.
-----
Country Name (2 letter code) [AU]: # your input here...
State or Province Name (full name) [Some-State]: # your input here...
Locality Name (eg, city) []: # your input here...
Organization Name (eg, company) [Internet Widgits Pty Ltd]: # your input here...
Organizational Unit Name (eg, section) []: # your input here...
Common Name (eg, YOUR name) []: # your input here...
Email Address []: # your input here...
Now enable ssl within apache:
sudo a2enmod sslYou'll see the following output:
Enabling module ssl.
See /usr/share/doc/apache2.2-common/README.Debian.gz on how to configure SSL and create self-signed certificates.
Run '/etc/init.d/apache2 restart' to activate new configuration!
We don't need to restart apache at the moment as we still have work to do! Also note, you can open and read the file they recommend and get apache config info straight from the horse's mouth too if you want! Here's a blog post that shows you the content of that file: http://oneqonea.blogspot.com/2013/04/whats-best-place-to-look-for-how-to.html
While we're at it let's enable apache's mod_rewrite too:
sudo a2enmod rewriteAgain, it's not necessary to restart your server at this time.
Next we're going to set up our virtual hosts. Run the following command:
sudo cp /etc/apache2/sites-available/default /etc/apache2/sites-available/your_site.comThen run:
sudo nano /etc/apache2/sites-available/your_site.comUpdate it with your site's info (and set "AllowOverride" to "All" to enable .htaccess files):
<VirtualHost *:80>
        ServerAdmin admin@your_site.com
        ServerName your_site.com
        ServerAlias www.your_site.com

        DocumentRoot /home/admin/your_site.com/www
        <Directory />
                Options FollowSymLinks
                AllowOverride None
        </Directory>
        <Directory /home/admin/your_site.com/www/>
                Options Indexes FollowSymLinks MultiViews
                AllowOverride All
                Order allow,deny
                allow from all
        </Directory>

        ScriptAlias /cgi-bin/ /usr/lib/cgi-bin/
        <Directory "/usr/lib/cgi-bin">
                AllowOverride None
                Options +ExecCGI -MultiViews +SymLinksIfOwnerMatch
                Order allow,deny
                Allow from all
        </Directory>

        ErrorLog /error.log

        # Possible values include: debug, info, notice, warn, error, crit,
        # alert, emerg.
        LogLevel warn

        CustomLog /access.log combined
</VirtualHost>
Also, be sure to add ServerName your_site.com and ServerAlias www.your_site.com after the ServerAdmin line (so you'll be in a position to host multiple https sites on a single machine).Now, we need to create almost the exact same thing in the same file but wrap the config settings in <VirtualHost *:443> rather than <VirtualHost *:80>, to do this easily, run the following series of commands:
su rootThen run the following TWO commands as root (we're appending to the new file so we want to run the same command twice):
cat /etc/apache2/sites-available/your_site.com >> /etc/apache2/sites-available/new_temp
cat /etc/apache2/sites-available/your_site.com >> /etc/apache2/sites-available/new_temp
Then exit from root:
exitThen replace your old file:
sudo mv /etc/apache2/sites-available/new_temp /etc/apache2/sites-available/your_site.comNow open your file for editing:
sudo nano /etc/apache2/sites-available/your_site.comScroll down to the second instance of <VirtualHost *:80> and replace it with:
<VirtualHost *:443>Now add the following two lines within your :443 settings block:
SSLEngine on
SSLCertificateFile /etc/apache2/ssl/your_site.com/apache.pem
Next, you need to create your website's document root. I do this by running a git clone. If you don't have git installed on your server or you haven't yet linked your machine with your BitBucket/GitHub account, checkout the following post before continuing (it's easy): http://oneqonea.blogspot.com/2013/04/how-do-i-install-git-and-link-my-linux.html
Okay cool, you're back. After checking out that post you should now have your project cloned to your remote machine (i.e. the document root dir referenced in our vhost config file now points to a directory that exists).
Next, we need to edit our ports.conf file:
sudo nano /etc/apache2/ports.confAdd the following line as depicted in the following image:
NameVirtualHost *:443

sudo a2ensite your_site.comOutput will tell you to run a follow up command. You don't need to at this time. Next run:
sudo a2dissite defaultNow restart apache (as opposed to reload):
sudo /etc/init.d/apache2 restartBadda bing, badda boom! You're up and running with a secure site! Now let's test it!
Put a "test" info.php file inside your project's web root:
echo '<?php phpinfo();' > your_site.com/www/info.phpNow access your_site.com/info.php via http first and https second. The following screenshots show what you should see!


If your screens look like my screens then you rock! Let's wrap up by removing our test file:
rm your_site.com/www/info.phpAfter doing that you're done! You can exit your remote machine.
exitCongrats!
In a future post we'll be looking at how to add a release management library I wrote called clitools to a CodeIgniter project and doing your first release to your new machine! Stay tuned!
Subscribe to:
Posts (Atom)
About Me

- John Erck
- I code. I figured I should start a blog that keeps track of the many questions and answers that are asked and answered along the way. The name of my blog is "One Q, One A". The name describes the format. When searching for an answer to a problem, I typically have to visit more than one site to get enough information to solve the issue at hand. I always end up on stackoverflow.com, quora.com, random blogs, etc before the answer is obtained. In my blog, each post will consist of one question and one answer. All the noise encountered along the way will be omitted.