Monday, May 6, 2013

How do I determine the version of Apache installed on a Debian based Linux machine?

Run the following command:
sudo apachectl -V
Which will print something similar to:
Server version: Apache/2.2.16 (Debian)
Server built:   Mar  3 2013 12:09:44
Server's Module Magic Number: 20051115:24
Server loaded:  APR 1.4.2, APR-Util 1.3.9
Compiled using: APR 1.4.2, APR-Util 1.3.9
Architecture:   64-bit
Server MPM:     Prefork
  threaded:     no
    forked:     yes (variable process count)
Server compiled with....
 -D APACHE_MPM_DIR="server/mpm/prefork"
 -D APR_HAS_SENDFILE
 -D APR_HAS_MMAP
 -D APR_HAVE_IPV6 (IPv4-mapped addresses enabled)
 -D APR_USE_SYSVSEM_SERIALIZE
 -D APR_USE_PTHREAD_SERIALIZE
 -D SINGLE_LISTEN_UNSERIALIZED_ACCEPT
 -D APR_HAS_OTHER_CHILD
 -D AP_HAVE_RELIABLE_PIPED_LOGS
 -D DYNAMIC_MODULE_LIMIT=128
 -D HTTPD_ROOT="/etc/apache2"
 -D SUEXEC_BIN="/usr/lib/apache2/suexec"
 -D DEFAULT_PIDLOG="/var/run/apache2.pid"
 -D DEFAULT_SCOREBOARD="logs/apache_runtime_status"
 -D DEFAULT_LOCKFILE="/var/run/apache2/accept.lock"
 -D DEFAULT_ERRORLOG="logs/error_log"
 -D AP_TYPES_CONFIG_FILE="mime.types"
 -D SERVER_CONFIG_FILE="apache2.conf"

Wednesday, May 1, 2013

How do I create a Facebook web app using CodeIgniter?

First things first, this tutorial assumes you have the following setup:
Okay, first we need to create a Facebook app. Go here: https://developers.facebook.com/apps?ref=bookmarks&count=0&fb_source=bookmark_apps&fb_bmpos=6_0 (and for the record, yes, I think that's a totally weird looking URL). Then, click the "Create New App" button as shown in the following screenshot:
Next, name your app and then click the "Continue" button:
Next, pass through the security check:
Great. Now fill out the rest of your application's profile as shown in this screenshot:
After clicking "Save Change" you'll see the following success message:

Okay, now download the latest version of CodeIgniter:
Then unzip your download:
Then add your own web root dir named "www" and rename your CI parent folder to your app's domain name:
Move the folder to your home directory:

Okay, now spin up a new web server:


Next, config your DNS:
Now open up Terminal and cd into your project directory.
cd ~/fbciexample.abovemarket.com
Now run the following command:
git init
You'll see the following output:
Initialized empty Git repository in /Users/johnerck/fbciexample.abovemarket.com/.git/
Next, add clitools for release management. If you don't already have clitools on your local machine, run the following command to git clone it to your home directory:
git clone git@bitbucket.org:abovemarket/clitools.org.git ~/clitools.org
You'll see the following output:
Cloning into '/Users/johnerck/clitools.org'...
remote: Counting objects: 132, done.
remote: Compressing objects: 100% (112/112), done.
remote: Total 132 (delta 41), reused 0 (delta 0)
Receiving objects: 100% (132/132), 256.54 KiB, done.
Resolving deltas: 100% (41/41), done.
Okay, after running that command, run this next:
php ~/clitools.org/clitools/installto.php ~/fbciexample.abovemarket.com/clitools
You'll see the following output:
Success: You've successfully installed clitools to ~/fbciexample.abovemarket.com/clitools/
Okay, now it's time to create both our local and remote databases:
After walking through the process pictured above twice (once locally, and once on your remote production machine), open the following two files:
open ~/fbciexample.abovemarket.com/clitools/_env.php
open ~/fbciexample.abovemarket.com/clitools/_release.php
Add your database credentials as illustrated:

The rest of this post is going to assume you have an empty database setup in both your local and remote environments and that you've properly filled out your _env.php and _release.php files.

We'll continue to use clitools throughout this tutorial but now is a good time to mention that you can read more about clitools at clitools.org.

Ok, back to the task at hand. Your local database should look like this:
Now again, on your local machine, run the following command:
php ~/fbciexample.abovemarket.com/clitools/uschema.php
After running that command you should see the following output:
mysql -h localhost -u fbciexample -p********** fbciexample < ~/fbciexample.abovemarket.com/clitools/changes/schema/1.sql
Success: Your database is up to date (at 1.sql)
Files Applied:
~/fbciexample.abovemarket.com/clitools/changes/schema/1.sql
Now, if you refresh your database page it should look like this:
If you click into the version table you'll see:

Next, create a BitBucket (or GitHub) project repo:
Next, on your local machine, go to the root of your project dir via the following command:
cd ~/fbciexample.abovemarket.com
Okay, now run the following commands:
git remote add origin ssh://git@bitbucket.org/abovemarket/fbciexample.abovemarket.com.git
git add .
git commit -m 'Initial commit'
Now open your .git/config file:
nano .git/config
Add the following lines to the end (make sure you indent using one tab rather than 4 spaces):
[branch "master"]
    remote = origin
    merge = refs/heads/master
Save the file. Push your changes:
git push -u origin --all
You'll see the following output:
Counting objects: 410, done.
Delta compression using up to 8 threads.
Compressing objects: 100% (394/394), done.
Writing objects: 100% (410/410), 2.17 MiB | 3.96 MiB/s, done.
Total 410 (delta 127), reused 0 (delta 0)
remote: bb/acl: johnerck is allowed. accepted payload.
To ssh://git@bitbucket.org/abovemarket/fbciexample.abovemarket.com.git
 * [new branch]      master -> master
Branch master set up to track remote branch master from origin.
Great. Now ssh into your remote machine:
ssh -p your_port you@your_ip_address
Remember that if you run into trouble here, it may be because you have MAMP turned on and so whatever domain you're using is resolving to localhost rather than hitting the net.

Now that you're on your remote machine, run the following command:
git clone git@bitbucket.org:abovemarket/fbciexample.abovemarket.com
You'll see the following output:
Cloning into fbciexample.abovemarket.com...
remote: Counting objects: 410, done.
remote: Compressing objects: 100% (267/267), done.
remote: Total 410 (delta 127), reused 410 (delta 127)
Receiving objects: 100% (410/410), 2.17 MiB, done.
Resolving deltas: 100% (127/127), done.
The directory created when you get cloned the project needs to match apache's web root. If you're interested in knowing how to set up vhosts, checkout a post I did awhile back on that topic: http://oneqonea.blogspot.com/2013/04/how-do-i-set-up-apache-virtual-hosts-on.html

This tutorial assumes you have your remote apache server environment set up properly. You can exit your remote machine:
exit
Okay, now it's time to release our app!

You can run a git status just to see where we're at right now.
git status
It should output:
# On branch master
nothing to commit (working directory clean)
Okay, great. Since our current branch is "clean", we know we can release. Since we're on the "master" branch, we know we're about to release master (this is the nature of clitools).

Run the following command:
php clitools/releaseto.php production
clitools will tell you what it's doing while it runs. The last line should say:
Local status: You've successfully released your project from master to production (v00.001.000)
clitools just did a number of things for us. A quick review would include:
  • Created a new release branch (rb00.001)
  • Created a new release tag from that branch (v00.001.000)
  • Ssh'd into our remote machine and checked out git tag v00.001.000
  • Triggered clitools/uschema.php (updated the target machine's database)
  • Triggered clitools/udata.php (php file that's available to be run on release if need be)
  • Updated clitools/version.php's file content with v00.001.000
  • Version stamped each change file applied (if target was "production")
  • Version stamped a copy of udata's source file (regardless of target environment but only if udata's source file was not empty)
  • Printed a success message to our screen and pushed the release branch to origin so the rest of our team can be in the loop!
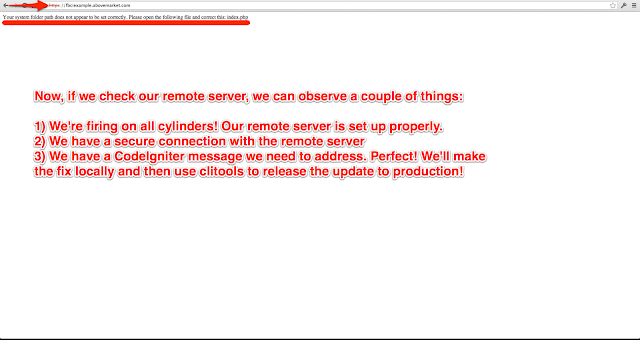
Now access your fbciexample.abovemarket.com:
On your local machine, run the following command:
open ~/fbciexample.abovemarket.com/www/index.php
Add the following lines of php code to the top of the file after the opening php tag:
require_once dirname(__FILE__) . '/../clitools/_env.php';
date_default_timezone_set('UTC'); // So we can call new DateTime();
Where the file says:
define('ENVIRONMENT', 'development');
Replace it with:
$ci_environment_translation = CLITOOLS__ENVIRONMENT === 'local' ? 'development' : CLITOOLS__ENVIRONMENT;
define('ENVIRONMENT', $ci_environment_translation);
If you want errors to get logged in production, switch production's error_reporting from error_reporting(0); to:
error_reporting(E_ALL);
Now set $system_path and $application_folder like so:
$system_path = CLITOOLS__CI_SYSTEM_PATH;
$application_folder = CLITOOLS__CI_APPLICATION_FOLDER;
Now open your clitools/_env.php file:
open ~/fbciexample.abovemarket.com/clitools/_env.php
Add the following lines to your _env.php file (but translated for YOUR local machine of course):
define('CLITOOLS__CI_SYSTEM_PATH', '/Users/johnerck/fbciexample.abovemarket.com/system');
define('CLITOOLS__CI_APPLICATION_FOLDER', '/Users/johnerck/fbciexample.abovemarket.com/application');
Now open your clitools/_release.php file:
open ~/fbciexample.abovemarket.com/clitools/_release.php
Add the following lines to your _release.php file's $content var (but translated for YOUR remote machine of course):
"define('CLITOOLS__CI_SYSTEM_PATH', '/home/admin/fbciexample.abovemarket.com/system');
define('CLITOOLS__CI_APPLICATION_FOLDER', '/home/admin/fbciexample.abovemarket.com/application');"
Now run:
git status
git add .
git commit -m 'Updated some environment related settings (i.e. fixed bug in app)'
git push
php clitools/releaseto.php production
clitools will tell you what it's doing while it runs. The last line should say:
Local status: You've successfully released your project from master to production (v00.002.000)
Now access your fbciexample.abovemarket.com
Congrats! You're on fire!

Want pretty URLs? Me too. Add the following .htaccess file in www/:
RewriteEngine On
RewriteBase /
RewriteCond %{REQUEST_FILENAME} !-f
RewriteCond %{REQUEST_FILENAME} !-d
RewriteRule ^(.*)$ index.php?/$1 [L]
Then
open application/config/config.php
and update to:
$config['index_page'] = ''; // Was previously 'index.php'
That's all for now. At a future date I'll extend this post to show you how to install Sparks (SolidSess to be exact). That's where FB comes into the mix too! Later!

Saturday, April 27, 2013

How do I set up Apache virtual hosts on a Debian based Linux machine and configure to support HTTPS?

Preliminary quick note, if you haven't enabled ssh keys between your local machine and your remote machine, I recommend that you do. I just posted a how to on this you can check out here: http://oneqonea.blogspot.com/2013/04/how-do-i-set-up-ssh-keys-and-turn-off_27.html

Okay, now on to virtual host configuration! Connect to your remote machine (hopefully via ssh keys!):
ssh -p your_port you@your_ip_address
Then run the following command:
sudo mkdir -p /etc/apache2/ssl/your_site.com
Then run the following command:
sudo openssl req -new -x509 -days 365 -nodes -out /etc/apache2/ssl/your_site.com/apache.pem -keyout /etc/apache2/ssl/your_site.com/apache.pem
You'll see the following output:
Generating a 1024 bit RSA private key
..++++++
...........................++++++
writing new private key to '/etc/apache2/ssl/your_site.com/apache.pem'
-----
You are about to be asked to enter information that will be incorporated
into your certificate request.
What you are about to enter is what is called a Distinguished Name or a DN.
There are quite a few fields but you can leave some blank
For some fields there will be a default value,
If you enter '.', the field will be left blank.
-----
Country Name (2 letter code) [AU]: # your input here...
State or Province Name (full name) [Some-State]: # your input here...
Locality Name (eg, city) []: # your input here...
Organization Name (eg, company) [Internet Widgits Pty Ltd]: # your input here...
Organizational Unit Name (eg, section) []: # your input here...
Common Name (eg, YOUR name) []: # your input here...
Email Address []: # your input here...
Now enable ssl within apache:
sudo a2enmod ssl
You'll see the following output:
Enabling module ssl.
See /usr/share/doc/apache2.2-common/README.Debian.gz on how to configure SSL and create self-signed certificates.
Run '/etc/init.d/apache2 restart' to activate new configuration!
We don't need to restart apache at the moment as we still have work to do! Also note, you can open and read the file they recommend and get apache config info straight from the horse's mouth too if you want! Here's a blog post that shows you the content of that file: http://oneqonea.blogspot.com/2013/04/whats-best-place-to-look-for-how-to.html

While we're at it let's enable apache's mod_rewrite too:
sudo a2enmod rewrite
Again, it's not necessary to restart your server at this time.

Next we're going to set up our virtual hosts. Run the following command:
sudo cp /etc/apache2/sites-available/default /etc/apache2/sites-available/your_site.com
Then run:
sudo nano /etc/apache2/sites-available/your_site.com
Update it with your site's info (and set "AllowOverride" to "All" to enable .htaccess files):
<VirtualHost *:80>
        ServerAdmin admin@your_site.com
        ServerName your_site.com
        ServerAlias www.your_site.com

        DocumentRoot /home/admin/your_site.com/www
        <Directory />
                Options FollowSymLinks
                AllowOverride None
        </Directory>
        <Directory /home/admin/your_site.com/www/>
                Options Indexes FollowSymLinks MultiViews
                AllowOverride All
                Order allow,deny
                allow from all
        </Directory>

        ScriptAlias /cgi-bin/ /usr/lib/cgi-bin/
        <Directory "/usr/lib/cgi-bin">
                AllowOverride None
                Options +ExecCGI -MultiViews +SymLinksIfOwnerMatch
                Order allow,deny
                Allow from all
        </Directory>

        ErrorLog /error.log

        # Possible values include: debug, info, notice, warn, error, crit,
        # alert, emerg.
        LogLevel warn

        CustomLog /access.log combined
</VirtualHost>
Also, be sure to add ServerName your_site.com and ServerAlias www.your_site.com after the ServerAdmin line (so you'll be in a position to host multiple https sites on a single machine).

Now, we need to create almost the exact same thing in the same file but wrap the config settings in <VirtualHost *:443> rather than <VirtualHost *:80>, to do this easily, run the following series of commands:
su root
Then run the following TWO commands as root (we're appending to the new file so we want to run the same command twice):
cat /etc/apache2/sites-available/your_site.com >> /etc/apache2/sites-available/new_temp
Then exit from root:
exit
Then replace your old file:
sudo mv /etc/apache2/sites-available/new_temp /etc/apache2/sites-available/your_site.com
Now open your file for editing:
sudo nano /etc/apache2/sites-available/your_site.com
Scroll down to the second instance of <VirtualHost *:80> and replace it with:
<VirtualHost *:443>
Now add the following two lines within your :443 settings block:
SSLEngine on
SSLCertificateFile /etc/apache2/ssl/your_site.com/apache.pem
Next, you need to create your website's document root. I do this by running a git clone. If you don't have git installed on your server or you haven't yet linked your machine with your BitBucket/GitHub account, checkout the following post before continuing (it's easy): http://oneqonea.blogspot.com/2013/04/how-do-i-install-git-and-link-my-linux.html

Okay cool, you're back. After checking out that post you should now have your project cloned to your remote machine (i.e. the document root dir referenced in our vhost config file now points to a directory that exists).

Next, we need to edit our ports.conf file:
sudo nano /etc/apache2/ports.conf
Add the following line as depicted in the following image:
NameVirtualHost *:443
Now is a good time to double check and make sure "your_site.com" points to "your_ip_address" at the DNS level. Once you've double checked that all we need to do is enable our site, disable default, and restart apache:
sudo a2ensite your_site.com
Output will tell you to run a follow up command. You don't need to at this time. Next run:
sudo a2dissite default
Now restart apache (as opposed to reload):
sudo /etc/init.d/apache2 restart
Badda bing, badda boom! You're up and running with a secure site! Now let's test it!

Put a "test" info.php file inside your project's web root:
echo '<?php phpinfo();' > your_site.com/www/info.php
Now access your_site.com/info.php via http first and https second. The following screenshots show what you should see!


If your screens look like my screens then you rock! Let's wrap up by removing our test file:
rm your_site.com/www/info.php
After doing that you're done! You can exit your remote machine.
exit
Congrats!

In a future post we'll be looking at how to add a release management library I wrote called clitools to a CodeIgniter project and doing your first release to your new machine! Stay tuned!

How do I install git and link my Linux machine to my BitBucket/GitHub account?

To start things off, connect to your remote machine:
ssh -p your_port you@your_ip_address
Now, see if you already have git installed:
which git
If your machine has git installed you'll see its path printed to your screen. Else, you'll need to install it:
sudo aptitude install git
You'll be prompted regarding incoming file size. Enter "yes". Now run:
which git
You'll see the program's path printed to your screen:
/usr/bin/git
Now we need to check and see if you have an ssh key pair on your machine or if we need to create one. To start off, we need to examine your remote machine. Run the following command:
cat ~/.ssh/id_rsa.pub
If the above command prints "No such file or directory", then you'll need to generate an ssh key pair before continuing. If the previous command printed a bunch of funny looking letters and numbers, then you already have an ssh key pair on your local machine that we can make use of!

Okay, so if your machine doesn't already have an ssh key pair on file, we can easily create one. Enter the following command:
ssh-keygen -t rsa -C "your_email@your_domain.com"
You'll be prompted with the following:
Enter file in which to save the key (/Users/you/.ssh/id_rsa):
Just press enter and "~/.ssh/id_rsa" will be used (which is what we want).

Next, you'll be prompted with the following:
Enter passphrase (empty for no passphrase):
Press enter twice to generate a key pair without a passphrase.

Now, at this point, everybody should have an "~/.ssh/id_rsa.pub" file on their remote machine. Next, log in to your BitBucket or GitHub account.

For BitBucket follow these steps:

  • Step 3) Print your machine's id_rsa.pub file content on the command line so you can manually copy it into memory:
    cat ~/.ssh/id_rsa.pub
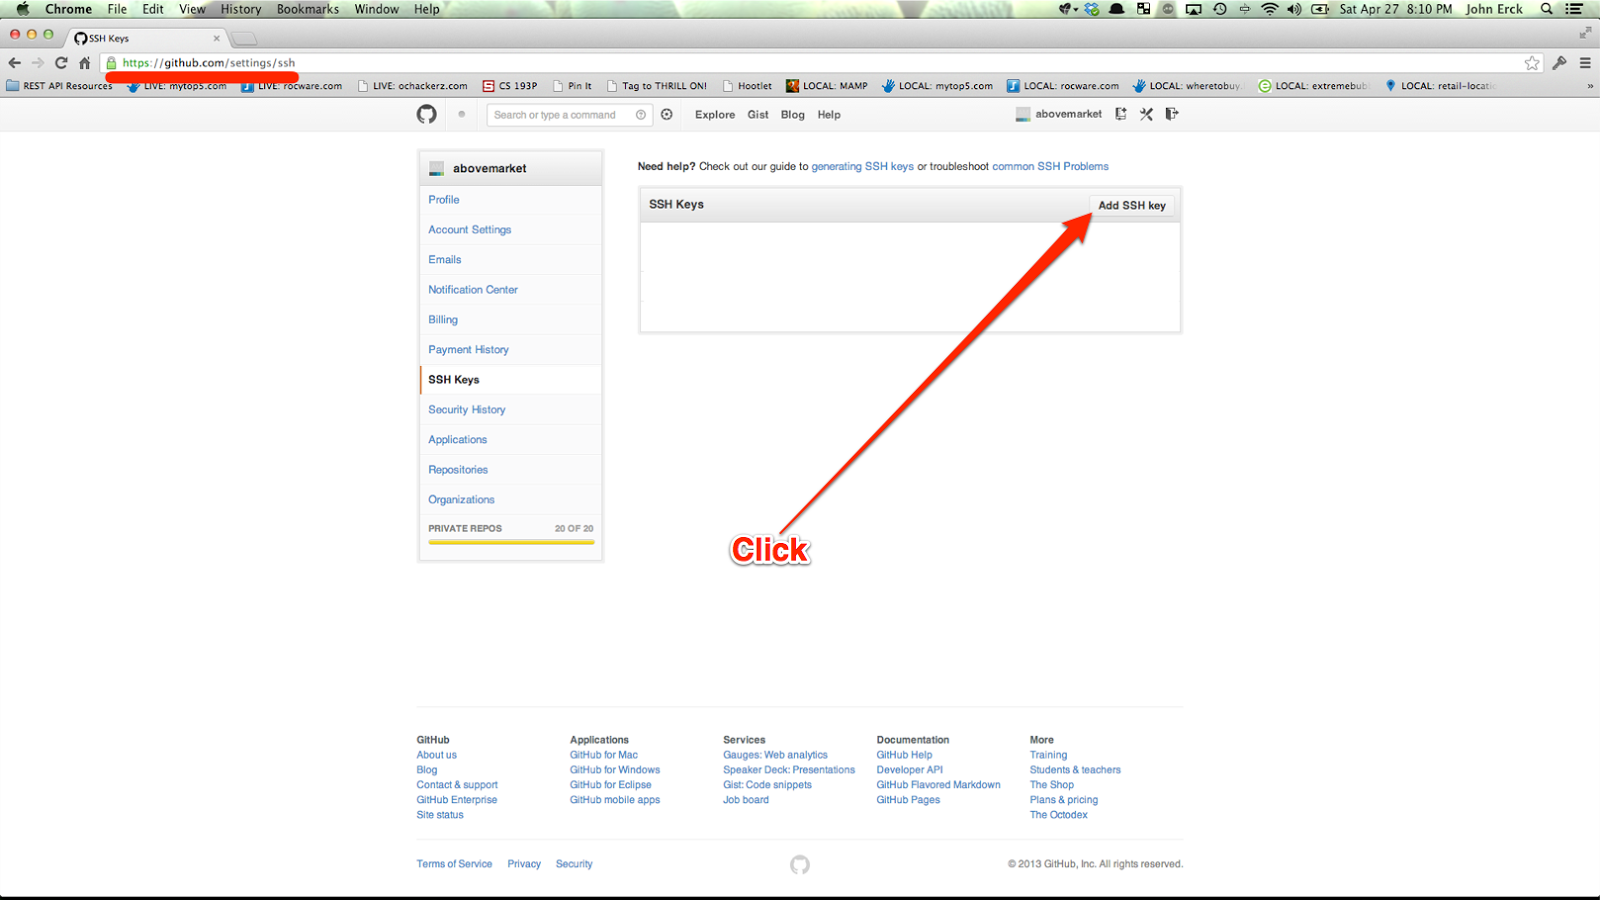
    After copying it, without getting a single extra character accidentally added, paste it into your BitBucket account as shown in the following screenshot:


For GitHub follow these steps:

  • Step 3) Print your machine's id_rsa.pub file content on the command line so you can manually copy it into memory:
    cat ~/.ssh/id_rsa.pub
    After copying it, without getting a single extra character accidentally added, paste it into your GitHub account as shown in the following screenshot:
Next, config git to use your BitBucket/GitHub email address:
git config --global user.name "Your Full Name Here"
git config --global user.email your_repo_email@your_domain.com
Now, clone your project!

For BitBucket:
git clone git@bitbucket.org:your_username/your_project.git your_domain.com
For GitHub:
git clone git@github.com:your_username/your_project.git your_domain.com
In either case, you'll be prompted about "The authenticity of host...", enter "yes".

Boom! You're done! Way to go!

Lastly, if you're coming from my post titled, "How do I set up Apache virtual hosts on a Debian based Linux machine and configure to support HTTPS?", you can get back to it here: http://oneqonea.blogspot.com/2013/04/how-do-i-set-up-apache-virtual-hosts-on.html

What's the best place to look for how to manage an Apache2 server running on a Debian-based Linux box?

If you don't already have apache2 installed on your machine, run the following command:
sudo aptitude install apache2
Then run:
sudo gunzip /usr/share/doc/apache2.2-common/README.Debian.gz
Followed up by:
cat /usr/share/doc/apache2.2-common/README.Debian
Which will print 399 lines of very helpful information:
Contents
========

 Apache2 Configuration under Debian GNU/Linux
  Files and Directories in /etc/apache2
  Tools

 Using mod_disk_cache

 SSL
  Enabling SSL
  Creating self-signed certificates
  SSL workaround for MSIE

 Suexec
 
 Documentation

 Upgrades

 Common Problems


Apache2 Configuration under Debian GNU/Linux
============================================

Debian's default Apache2 installation attempts to make adding and
removing modules, virtual hosts, and extra configuration directives as
flexible as possible, in order to make automating the changes and
administering the server as easy as possible.

Please be aware that this layout is quite different from the standard
Apache configuration. Due to the use of environment variables, apache2
needs to be started/stopped with /etc/init.d/apache2 or apache2ctl. 
Calling /usr/bin/apache2 directly will not work with the default
configuration. To call apache2 with specific command line arguments,
just call apache2ctl with the same arguments.

Files and Directories in /etc/apache2:
-------------------------------------

apache2.conf

 This is the main configuration file.

envvars

 This contains environment variables that may be used in the
 configuration. Some settings, like user and pid file, need to
 go in here so that other scripts can use them. It can also
 be used to change some default settings used by apache2ctl.
 Here is also the default LANG=C setting that can be changed
 to a different language.

conf.d/

 Files in this directory are included by this line in
 apache2.conf:

 # Include generic snippets of statements
 Include /etc/apache2/conf.d

 This is a good place to add additional configuration
 directives. Packages should not use configuration
 files that start with 'local-' or end with '.local'.
 The local administrator can use these filenames to make
 sure that there are no conflicts with files provided by
 packages.

 If the local administrator is not comfortable with packages
 activating their config files by default, it is possible
 to change the 'Include /etc/apache2/conf.d/' in apache2.conf
 into 'Include /etc/apache2/conf.d.enabled/' and create that
 directory. He can then put symlinks to the files in conf.d
 which he wants to enable into conf.d.enabled.

httpd.conf

 Empty file.

magic

 Patterns for mod_mime_magic. This is not compatible with the format
 used by current versions of the file/libmagic packages.

mods-available/

 This directory contains a series of .load and .conf files.
 The .load files contain the Apache configuration directive
 necessary to load the module in question.  The respective
 .conf files contain configuration directives necessary to
 utilize the module in question.

mods-enabled/

 To actually enable a module for Apache2, it is necessary to
 create a symlink in this directory to the .load (and .conf, if
 it exists) files associated with the module in
 mods-available/.  For example:

 cgi.load -> /etc/apache2/mods-available/cgi.load

ports.conf

 Configuration directives for which ports and IP addresses to
 listen to.

sites-available/

 Like mods-available/, except it contains configuration
 directives for different virtual hosts that might be used with
 apache2.  Note that the hostname doesn't have to correspond
 exactly with the filename.  'default' is the default host.

sites-enabled/

 Similar in functionality to mods-enabled/, sites-enabled
 contains symlinks to sites in sites-available/ that the
 admnistrator wishes to enable.

 Apache uses the first VirtualHost that matches the IP/Port
 as default for named virtual hosts. Therefore the 'default'
 site is linked to '000-default' so that it will be read first.

 Example:
 dedasys -> /etc/apache2/sites-available/dedasys

The Include directive ignores files with names that

- do not begin with a letter or number
- contain a character that is neither letter nor number nor _-.
- contain .dpkg

Other files
-----------

For historical reasons, the pid file is in /var/run/apache2.pid and not in
/var/run/apache2/apache2.pid.

Tools
-----

a2enmod and a2dismod are available for enabling and disabling modules utilizing
the above configuration system.

a2ensite and a2dissite do essentially the same thing as the above tools, but
for sites rather than modules.

apxs2 -a/-A is modified to use a2enmod to activate newly installed modules.


Using mod_disk_cache
====================

To ensure that the disk cache does not grow indefinitely, htcacheclean is
started when mod_disk_cache is enabled. Both daemon and cron (daily) mode
are supported. The configuration (run mode, cache size, ...) is in
/etc/default/apache2 .

Normally, htcacheclean is automatically started and stopped by
/etc/init.d/apache2. However, if you change the state of mod_disk_cache or the
configuration of htcacheclean while apache2 is running, you may need to
manually start/stop htcacheclean with "/etc/init.d/apache2 start-htcacheclean"
or "/etc/init.d/apache2 stop-htcacheclean".


SSL
===

Enabling SSL
------------

To enable SSL, type (as user root):

 a2ensite default-ssl
 a2enmod ssl

If you want to use self-signed certificates, you should install the ssl-cert
package (see below). Otherwise, just adjust the SSLCertificateFile and
SSLCertificateKeyFile directives in /etc/apache2/sites-available/default-ssl to
point to your SSL certificate. Then restart apache:

 /etc/init.d/apache2 restart

The SSL key file should only be readable by root, the certificate file may be
globally readable. These files are read by the Apache parent process which runs
as root. Therefore it is not necessary to make the files readable by the
www-data user.

Creating self-signed certificates
---------------------------------

If you install the ssl-cert package, a self-signed certificate will be
automatically created using the hostname currently configured on your computer.
You can recreate that certificate (e.g. after you have changed /etc/hosts or
DNS to give the correct hostname) as user root with:

 make-ssl-cert generate-default-snakeoil --force-overwrite

To create more certificates with different host names, you can use

 make-ssl-cert /usr/share/ssl-cert/ssleay.cnf /path/to/cert-file.crt

This will ask you for the hostname and place both SSL key and certificate in
the file /path/to/cert-file.crt . Use this file with the SSLCertificateFile
directive in the Apache config (you don't need the SSLCertificateKeyFile in
this case as it also contains the key). The file /path/to/cert-file.crt should
only be readable by root. A good directory to use for the additional
certificates/keys is /etc/ssl/private .

SSL workaround for MSIE
-----------------------

The SSL workaround for MS Internet Explorer needs to be added to your SSL
VirtualHost section (it was previously in ssl.conf but caused keepalive to be
disabled even for non-SSL connections):

 BrowserMatch "MSIE [2-6]" \
  nokeepalive ssl-unclean-shutdown \
  downgrade-1.0 force-response-1.0
 BrowserMatch "MSIE [17-9]" ssl-unclean-shutdown

The default SSL virtual host in /etc/apache2/sites-available/default-ssl
already contains this workaround.


Suexec
======

Debian ships two version of the suexec helper program required by mod_suexec.
It is not installed by default, to avoid possible security issues. The package
apache2-suexec contains the standard version that works only with document root
/var/www, userdir suffix public_html, and Apache run user www-data. The package
apache2-suexec-custom contains a customizable version, that can be configured
with a config file to use different settings (like /srv/www as document root).
For more information see the suexec(8) man page in the apache2-suexec-custom
package.

Since apache2-suexec-custom has received less testing and might be slightly
slower, apache2-suexec is the recommended version unless you need the features
from apache2-suexec-custom.


Documentation
=============

The full Apache 2 documentation can be found on the web at

http://httpd.apache.org/docs/2.2/

or, if you have installed the apache2-doc package, in

/usr/share/doc/apache2-doc/manual/

or at

http://localhost/manual/

There is also a wiki that contains useful information:

http://wiki.apache.org/httpd/

Some hints about securing Apache 2 on Debian are available at

http://wiki.debian.org/Apache/Hardening


Upgrades
========

Changes in the Apache packages that require manual configuration adjustments
are announced in NEWS.Debian. Installing the apt-listchanges package is
recommended. It will display the relevant NEWS.Debian sections before
upgrades.


Multiple instances
==================

There is some support for running multiple instances of Apache2 on the same
machine. See /usr/share/doc/apache2.2-common/README.multiple-instances for more
information.


Common Problems
===============

1) Error message "Could not reliably determine the server's fully qualified 
domain name, using 127.0.0.1 for ServerName" during start

This can usually be ignored but it means that Apache httpd was unable to obtain
a fully-qualified hostname by doing a reverse lookup on your server's IP
address. You may want to add the fully-qualified hostname to /etc/hosts .
An alternative is to specify "ServerName 127.0.0.1" in the global server
context of the configuration, e.g. in /etc/apache2/conf.d/servername.local .

2) Error message "mod_rewrite: could not create rewrite_log_lock"

This probably means that there are some stale SYSV semaphores around. This
usually happens after apache2 has been killed with kill -9 (SIGKILL). You can
clean up the semaphores with:

 ipcs -s | grep www-data | awk ' { print $2 } ' | xargs ipcrm sem

3) Message "NameVirtualHost *:80 has no VirtualHosts" in error log

Probably the VirtualHost definitions have not been adjusted after the 
NameVirtualHost directive was changed in ports.conf. 
See /usr/share/doc/apache2.2-common/NEWS.Debian.gz

4) Message "File does not exist: /etc/apache2/htdocs" in error log

In most cases this means that no matching VirtualHost definition could be
found for an incoming request. Check that the target IP address/port and the
name in the Host: header of the request actually match one of the virtual
hosts.

5) Message "Couldn't create pollset in child; check user or system limits" in
  error log

On Linux kernels since 2.6.27.8, the value in

    /proc/sys/fs/epoll/max_user_instances

needs to be larger than

    for prefork/itk  MPM: 2 * MaxClients
    for worker/event MPM: MaxClients + MaxClients/ThreadsPerChild

It can be set on boot by adding a line like

        fs.epoll.max_user_instances=1024

to /etc/sysctl.conf.

There are several other error messages related to creating a pollset that can
appear for the same reason.

On the other hand, errors about to adding to a pollset are related to the
setting fs.epoll.max_user_watches. On most systems, max_user_watches should be
high enough by default.

6) Message "Server should be SSL-aware but has no certificate configured" in
   error log

Since 2.2.12, Apache is stricter about certain misconfigurations concerning
name based SSL virtual hosts. See NEWS.Debian.gz for more details.

7) Apache does not pass Authorization header to CGI scripts

This is intentional to avoid security holes. If you really want to change it,
you can use mod_rewrite:

 RewriteCond %{HTTP:Authorization} (.*)
 RewriteRule . - [env=HTTP_AUTHORIZATION:%1]

8) mod_dav is behaving strangely

In general, if you use mod_dav_fs, you need to disable multiviews and script
execution for that directory. For example:

    <Directory /var/www/dav>
        Dav on
        Options -MultiViews -ExecCGI
        SetHandler none
        <IfModule mod_php5.c>
            php_admin_value engine Off
        </IfModule>
    </Directory>

9) Message "apache2: bad user name " when starting apache2
   directly

Use apache2ctl (it accepts all options of apache2).

10) Apache is using a lot of memory and is not freeing it even when idle

By default, Apache will not give back unused memory but keep it around for
later use.

  * Tune StartServers, MaxRequestsPerChild, MinSpareThreads/MinSpareServers,
    MaxSpareThreads/MaxSpareServers in /etc/apache2/apache2.conf

  * If you are really starved for memory, try adding 'MaxMemFree 4' to your
    Apache configuration. This will reduce Apache's performance.
    Because of the way Apache's memory allocator interacts with glibc's malloc,
    higher values of MaxMemFree don't have much effect.

11) A PUT with mod_dav_fs fails with "Unable to PUT new contents for /...
[403, #0]" even if Apache has permission to write the file.

Apache also needs write permission to the directory containing the file, in
order to replace it atomically.

12) How to increase the ulimit for the max number of open files?

Add the following line to /etc/apache2/envvars:

 APACHE_ULIMIT_MAX_FILES='ulimit -n 65536'

How do I set up ssh keys and turn off password access on my new Linux box?

To start off, we need to examine your local machine. Run the following command:
cat ~/.ssh/id_rsa.pub
If the above command prints "No such file or directory", then you'll need to generate an ssh key pair before continuing. If the previous command printed a bunch of funny looking letters and numbers, then you already have an ssh key pair on your local machine that we can make use of!

Okay, so if your machine doesn't already have an ssh key pair on file, we can easily create one. Enter the following command:
ssh-keygen -t rsa -C "your_email@example.com"
You'll be prompted with the following:
Enter file in which to save the key (/Users/you/.ssh/id_rsa):
Just press enter and "~/.ssh/id_rsa" will be used (which is what we want).

Next, you'll be prompted with the following:
Enter passphrase (empty for no passphrase):
Press enter twice to generate a key pair without a passphrase.

Now, at this point, everybody should have an "~/.ssh/id_rsa.pub" file on their local machine. Next, connect to your remote machine using your password:
ssh -p your_port you@your_ip_address
Then, run the following command (to ensure you have an ".ssh" dir on file):
mkdir -p ~/.ssh
Now exit and return to your local machine:
exit
Next, copy your public key to your remote machine:
scp -P your_ssh_port ~/.ssh/id_rsa.pub your_user@your_ip_address:~/incoming_public_key.pub
Next, connect to your remote machine via username and password:
ssh -p your_port you@your_ip_address
Next, enter the following command:
cat ~/incoming_public_key.pub >> ~/.ssh/authorized_keys
Then remove the source file:
rm ~/incoming_public_key.pub
Now, exit your remote machine:
exit
SSH keys have now been set up! Now, with a single command you're into your remote machine:
ssh -p your_ssh_port you@your_ip_address
Boom! Time to disallow password-based ssh connections.

K, starting from within your remote machine, run the following command:
sudo nano /etc/ssh/sshd_config
Then, scroll down to the section that looks like this:
# Change to no to disable tunnelled clear text passwords
PasswordAuthentication yes
and switch it to this:
# Change to no to disable tunnelled clear text passwords
PasswordAuthentication no
Save the file. Now restart the ssh daemon:
sudo /etc/init.d/ssh restart
Boom. We're done, ssh key pair connections only! Before exiting the remote machine you can validate this yourself if you'd like by walking through the following process:
  • Step 0) Make sure you have an open connection to your remote machine.
  • Step 1) Open a new Terminal window.
  • Step 2) Run the following command on your remote machine:
mv ~/.ssh/authorized_keys ~/.ssh/authorized_keys_mimic_no_machines_authed
  • Step 3) In your other Terminal window (local machine), try to ssh into your machine:
ssh -p your_ssh_port you@your_ip_address
You'll see the following output:
Permission denied (publickey).
Boom! Now das wassup!

If you're interested in what's going on process-wise, here's the skinny: By moving the location of the "authorized_keys" file on the remote machine we're mimicking your local machine not having a "machine to machine ssh key connection" with your remote box. Therefore, when we run the above ssh command, ssh first tries to connect using your machine's local ssh key pair, but gets denied because the public key counterpart is "not on file" on our remote machine (remember that we moved the "authorized_keys" file to "authorized_keys_mimic_no_machines_authed" to create this scenario). Next, ssh looks to use a password picked up from the command line and gets rejected on that due to our latest sshd config update! Woo hoo! At this point you can test connecting with your root user too if you'd like and you'll see that not even root can log in to the remote machine! Now you see why I said, "Make sure you have an open connection to your remote machine." in "Step 0" above. Let's put things back now. Run the following command on your remote machine:
mv ~/.ssh/authorized_keys_mimic_no_machines_authed ~/.ssh/authorized_keys
Now, from your other Terminal window, you can run:
ssh -p your_ssh_port you@your_ip_address
And boom you'll be good to go.

Now das wassup! You're done! You can even exit your remote machine if you want!
exit
Lastly, if you're coming from my "How do I set up Apache virtual hosts on a Debian based Linux machine and configure to support HTTPS?" post, you can get back to it here: http://oneqonea.blogspot.com/2013/04/how-do-i-set-up-apache-virtual-hosts-on.html

Sunday, April 21, 2013

How do I install the latest versions of Apache, MySQL, and PHP on a Debian based Linux machine?

What up! So you want to know how to install the latest versions of Apache, MySQL, and PHP on a Debian based Linux machine? Sweet. Me too.

If you need help getting a Debian based Linux machine online, check out a post I did the other day titled: How do I set up a Next Generation Rackspace Cloud Server running Debian 7 (Wheezy)?

Okay, slap yourself in the face real quick. It's time to get started!

SSH into your machine.

Then walk through the following post: How do I install mysql-client, mysql-server, and libmysqlclient-dev on a Next Generation Rackspace Cloud Server running Debian 7 (Wheezy)? Note that you can skip the libmysqlclient-dev piece.

Great. You're back. Okay, now run the following command:
sudo aptitude install apache2
You'll be prompted to "ok" the amount of space that will be used after unpacking the archives. Enter "yes" to proceed.

Apache's default document root is /var/www on Debian, and the configuration file is /etc/apache2/apache2.conf. Additional configurations are stored in subdirectories of the /etc/apache2 directory such as /etc/apache2/mods-enabled (for Apache modules), /etc/apache2/sites-enabled (for virtual hosts), and /etc/apache2/conf.d.

If you enter your server's IP address into your browser, you'll see that we're on fire!
Okay, now on to installing php:
sudo aptitude install php5
PHP 5.4 will be installed. If you're setting up a Debian 6.0 (Squeeze) box and require php 5.4 (like I used to) then splash some hot coffee in your face because we've got an extra couple of steps to perform!

Run the following command:
sudo nano /etc/apt/sources.list
Add the following lines to the end of the file:
# http://www.dotdeb.org/instructions/ (but only for php54)
deb http://packages.dotdeb.org squeeze-php54 all
deb-src http://packages.dotdeb.org squeeze-php54 all
Now save the file. Next, run the following two commands:
wget http://www.dotdeb.org/dotdeb.gpg
cat dotdeb.gpg | sudo apt-key add -
After doing that, we can now update our list of available packages via the following command:
sudo aptitude update
Ok, now we can install php 5.4 via the following command:
sudo aptitude install php5
Boom goes the dynamite! We can verify our install by running the following command:
php -v
Which will output:
PHP 5.4.14-1~dotdeb.1 (cli) (built: Apr 21 2013 05:21:34)
Copyright (c) 1997-2013 The PHP Group
Zend Engine v2.4.0, Copyright (c) 1998-2013 Zend Technologies
Okay, sweet! Now that we have php installed we can put a dot php file in apache's default document root (/var/www), restart apache, and then test our new setup. To begin, run the following command:
sudo nano /var/www/info.php
Then enter:
<?php
phpinfo();
Save the file. Now restart apache (since we haven't done so yet since installing php) via the following command:
sudo /etc/init.d/apache2 restart
Now access your new info.php page. You'll see the following:
You'll see we now have php working via the "Apache 2.0 Handler" (see "Server API" line). If you do a search for "mysql" you'll see that "mysql" is nowhere to be found! We'll need to fix that (as well as install other useful php modules). To see your options, run the following command:
aptitude search php5
I recommend installing php5-mysql, php5-curl, php5-gd, php-pear, php5-imagick, php5-imap, php5-mcrypt, php5-memcache, php5-sqlite, php5-tidy, php5-xmlrpc, and php5-xsl via the following command:
sudo aptitude install php5-mysql php5-curl php5-gd php-pear php5-imagick php5-imap php5-mcrypt php5-memcache php5-sqlite php5-tidy php5-xmlrpc php5-xsl
Okay sweet. Now we're talking! Revisit your info.php page (aptitude will have already restarted apache for you), do a search for "mysql" and then revel in your success! You are on fire!
Okay, now if you're anything like me you'd like a web interface to your remote database. PHPMyAdmin has you covered... but only if we install it! Get started with the following command:
sudo aptitude install phpmyadmin
As usual you'll be prompted about incoming file size. Enter "yes" when prompted. Next, you'll be presented with the following package configuration screen:

Select "apache2". You'll then be prompted with a second package configuration screen:

Select "No". And boom! You've got PHPMyAdmin installed! Not! There's actually one more step. To see for yourself visit your /phpmyadmin page and observe the 404!
To fix this. Run the following command:
sudo nano /etc/apache2/conf.d/phpmyadmin.conf
Then add the following line to the file:
Include /etc/phpmyadmin/apache.conf
Save the file. Then, restart apache via the following command:
sudo /etc/init.d/apache2 restart
Now revisit your /phpmyadmin page and observe your awesomeness!
Now that we've got our system set up properly we can remove our info.php file via the following command:
sudo rm /var/www/info.php
Now das wassup! Congrats, you're done! You successfully installed the latest versions of Apache, MySQL, and PHP.

If you're interested in getting your Apache hosting environment set up you should check out a post I wrote the other day titled: How do I set up Apache virtual hosts on a Debian based Linux machine and configure to support HTTPS?

About Me

My photo
I code. I figured I should start a blog that keeps track of the many questions and answers that are asked and answered along the way. The name of my blog is "One Q, One A". The name describes the format. When searching for an answer to a problem, I typically have to visit more than one site to get enough information to solve the issue at hand. I always end up on stackoverflow.com, quora.com, random blogs, etc before the answer is obtained. In my blog, each post will consist of one question and one answer. All the noise encountered along the way will be omitted.